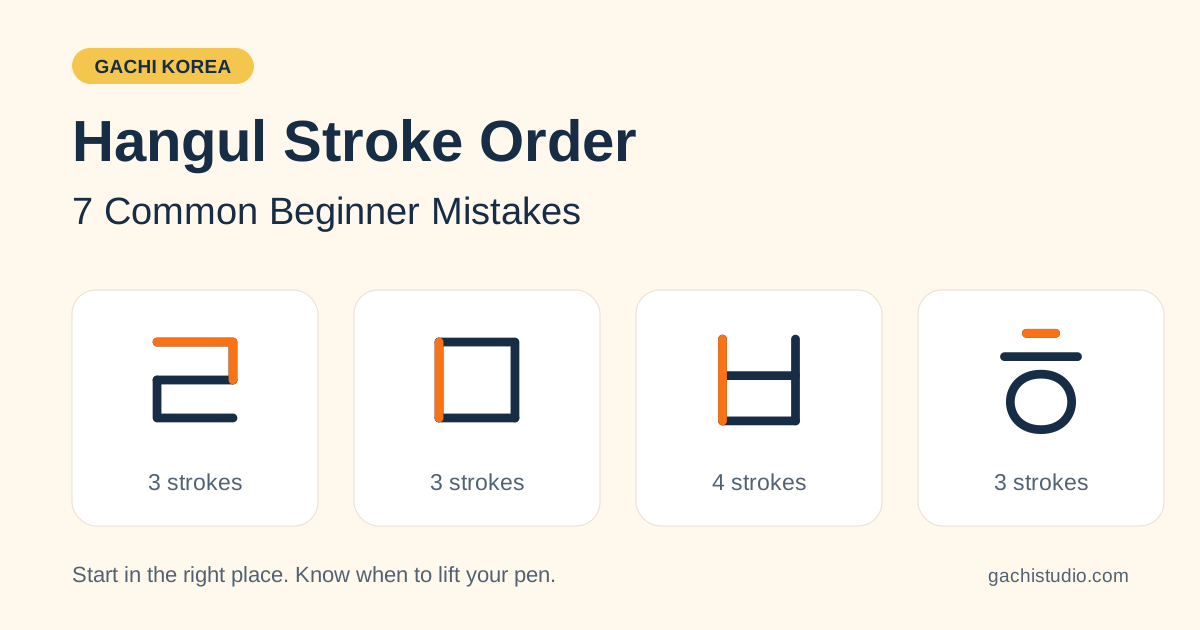
Does your Korean handwriting look close to the example, but feel awkward to write? You may be starting in the wrong place, lifting your pen halfway through a connected stroke, or copying the outline of a font instead of the movement of a pen.
Hangul stroke order is the sequence and direction used to write each Korean letter. A stroke can turn a corner without a pen lift. That distinction is especially useful for ㄹ and ㅁ: the number of straight lines you can see is not necessarily the number of strokes you write.
This guide focuses on seven beginner mistakes you can check during your next writing session. You will practise a clear beginner model, compare similar letters and finish with a short attempt from memory. Handwriting styles and typefaces vary, so use one consistent model while you learn rather than trying to imitate every version at once.
Have a pencil ready? Open our free Hangul stroke-order practice tool in another tab. Choose a letter, press Animate, then use Next stroke to check the movement one step at a time.
A quick Hangul stroke-order check
Before writing, ask yourself three questions: Where does my pen start? Which direction does it move? When do I lift it? “Top to bottom” and “left to right” are helpful starting principles, but they do not replace a letter-specific model. Diagonal and circular strokes need their own attention.
| Letter | Beginner model used here | What to check |
|---|---|---|
| ㄹ | 3 strokes | Keep the two corner strokes connected |
| ㅁ | 3 strokes | Start with the left side |
| ㅂ | 4 strokes | Keep the top open |
| ㅎ | 3 strokes | Use one top mark, a longer line and a circle |
Use the table as a quick reminder after watching the animation. It is easier to understand a movement when you see it and then immediately try it on paper.
1. Counting every straight line as a separate stroke
The mistake: you stop at every corner because the character looks like a set of separate lines. The result may be recognisable, but you are learning unnecessary pen lifts.
In the beginner model used by our tool, ㄱ is one connected movement: across, then down. ㄴ also turns a corner in one movement: down, then across. A change of direction does not automatically mean a new stroke.
Try this: write ㄱ three times. On the first attempt, say “turn” at the corner. On the second, keep the movement smooth. On the third, look away from the model and write it again. Check the movement, not just the finished shape.
Think of the numbered steps as separate pen journeys. When a step contains a bend, stay on that journey until it ends. Lift only when the next numbered step begins.
2. Writing ㄹ as five disconnected lines—or one long zigzag
The mistake: you either break every corner apart or draw the entire letter without lifting. Both approaches miss the three-part sequence in this model.
For ㄹ (rieul), write:
- The top line to the right, then turn down.
- The middle line from left to right.
- The left side down, then turn right along the bottom.
Notice the reset before the middle line. It begins on the left; you do not simply continue backwards from the end of the top-right corner.
Try this: use the tool's numbered steps to pause between movements. Write one large ㄹ and put your pencil down between steps. Then write a smaller version with the same sequence. Large practice helps you notice the turn; smaller practice helps you keep the letter balanced.
If your ㄹ becomes hard to recognise, check the space between its horizontal lines before increasing your speed. A readable letter matters more than a fast one.
3. Starting ㅁ with the top edge
The mistake: you draw a square as though you were outlining a box, beginning wherever your hand happens to land.
For ㅁ (mieum), start with the left side going down. Return to the top-left for a connected top-and-right stroke. Close the bottom last, moving right.
Try this: say “left, corner, close” as you write. Those three cues remind you that the top-right corner belongs to one movement. Do not add a separate fourth stroke just because the letter has four sides.
After two supported attempts, cover the model. Write ㅁ once and check whether you remembered the starting point. If you hesitate, look again, then retry on a fresh space. There is no need to fill a whole page before correcting one small problem.
4. Closing the top of ㅂ or confusing it with ㅁ
The mistake: you add a top bar to ㅂ because you expect every box-like consonant to be enclosed.
For ㅂ (bieup), write the left upright, the right upright, the middle bar and the bottom bar. The two uprights extend above the middle bar; no extra line closes the top.
Try this comparison: write ㅁ · ㅂ · ㅁ · ㅂ, leaving a little space between letters. Point to the feature that distinguishes each pair. For ㅁ, look for the closed box. For ㅂ, look for the open upper section and the middle bar.
Next, shuffle the order: ㅂ, ㅁ, ㅂ. This makes you choose a letter deliberately instead of repeating the rhythm of an alternating pattern. When that feels comfortable, try the familiar syllables 마 and 바 while keeping the consonants distinct.
5. Adding an extra stem to ㅎ
The mistake: you combine different printed or handwritten versions of ㅎ and end up adding both a short top bar and an extra stem.
Our model for ㅎ (hieut) uses three strokes: a short horizontal top mark, a longer horizontal line below it, and a counterclockwise circle. Keep the circle distinct from the line above.
You may also see a short vertical top mark in handwriting and some fonts. That is a variation of the top mark, not an instruction to add another stroke to the horizontal-top version.
Try this: select ㅎ in the tool and follow the model through all three steps. Then compare your result with the same model. Avoid switching fonts midway through the exercise. Once you understand the parts clearly, recognising other handwriting styles becomes a separate, useful skill.
6. Reversing a vowel stroke or treating ㅐ and ㅔ as identical
The mistake: you recognise a vowel's finished outline and assume its short line can be drawn in either direction.
Watch ㅓ and ㅗ especially carefully in the tool. For ㅓ, the short line moves right before the long vertical is written downward. For ㅗ, the short vertical moves downward before the long horizontal is added.
Also compare ㅐ and ㅔ visually. They are different written letters. In ㅐ, the short line connects the long verticals; in ㅔ, it projects left from the first long vertical, with another vertical to the right. Whatever pronunciation model you are learning, preserve that spelling distinction.
Try this: copy one pair slowly, cover it and reproduce the pair underneath. Compare the location of the short line. If you corrected only one detail today, make that detail intentional in the next attempt.
7. Mixing the parts of double consonants and compound vowels
The mistake: you alternate between the two halves of a complex letter, or make each half so wide that the result no longer fits comfortably in a syllable block.
For ㄲ, ㄸ, ㅃ, ㅆ and ㅉ, complete the left consonant before the right. For a vowel such as ㅘ, practise its components, ㅗ and ㅏ, then combine them in that order. The tool shows the component sequence for each compound vowel.
The Compound vowels section includes ㅐ, ㅒ, ㅔ, ㅖ, ㅘ, ㅙ, ㅚ, ㅝ, ㅞ, ㅟ and ㅢ. This is a practical grouping for learning their written forms; it does not mean every item has the same pronunciation structure.
Try this progression: write ㄱ, then ㄲ; write ㅂ, then ㅃ. Next, write ㅗ and ㅏ separately before attempting ㅘ. Give yourself a new practice box for each attempt. Focus on finishing one component before beginning the next.
Watch the Korean consonant writing lesson
Use our guided video for the 14 basic consonants, ㄱ–ㅎ. Watch a letter, pause during the writing opportunity and make your own attempt. For double consonants and compound vowels, use the expanded tool below; this video focuses on basic consonants.
Watch the consonant writing lesson on YouTube →
Practise with the free Hangul stroke-order tool
See the movement, not just the finished letter
Choose from 40 letters: 14 basic consonants, 5 double consonants, 10 basic vowels and 11 compound vowels. Follow each coloured stroke, match it to the numbered instructions and replay any step.
Open the free stroke-order tool →Keep the tool next to a sheet of paper. Watch once, write once, then compare. If a step feels confusing, choose its numbered instruction instead of replaying every letter from the beginning.
Continue on paper with a Korean writing workbook
The Gachi Korea Korean Consonant Writing Workbook is a paid companion for basic consonant practice. Use it to continue the writing routine after the video and tool. Visit our Etsy shop, open the product listing and check the preview and contents before purchasing. This article and the online tool also cover advanced letters; do not assume those are all included in the basic consonant workbook.
A simple five-minute routine is enough to give today's session a clear purpose:
- Watch: choose one troublesome letter, such as ㄹ or ㅎ.
- Copy: write it slowly while looking at the model.
- Compare: check its starting point, direction and pen lifts.
- Recall: cover the model and write one more attempt.
- Return: try that letter again at the start of your next session.
The goal is to make one specific improvement you can recognise. “I kept the top-right corner of ㅁ connected” is more useful feedback than simply deciding your handwriting is good or bad.
Make your next Korean lesson a writing session
Browse Gachi Korea's available Korean learning materials and see the latest workbook previews in our Etsy shop.
Shop Korean Workbooks on Etsy →Keep learning
- Learn the 14 Korean consonant names with a song
- Explore the Korean consonants guide
- Follow the KR100 Hangul learning path
Reference for the beginner writing models: The Korean Tutor, Beginner Level Unit 1, Part 1. The practice suggestions and explanations above are Gachi Korea's own learning activities.